对 Java 开发者来说,2017 年 9 月是个热闹的月份,Java SE 9、Java EE 8
相继发布,而 Spring 也在这段时间,发布了 5.0 正式版本。
身为 Java 开发者,对于 Spring 框架并不陌生。Spring 在 Rod Johnson
十几年前一个人单挑 J2EE 体系开始,到十年前开始大行其道至今,基本上已是
Java 开发领域的事实标准了。
Spring 5
中最重要改动是把反应式编程的思想应用到了框架的各个方面,Spring 5
的反应式编程以 Reactor 库为基础。Spring 5
框架所包含的内容很多,这里只重点介绍其中新增的 WebFlux
模块。我们可以使用 WebFlux 创建高性能的 Web 应用和客户端。本文对 WebFlux
模块进行了详细介绍,包括其中的 HTTP、服务器推送事件(SSE)和 WebSocket
支持。
WebFlux 简介
WebFlux 模块的名称是 spring-webflux,名称中的 Flux 来源于 Reactor
中的类 Flux。该模块中包含了对反应式 HTTP、服务器推送事件和 WebSocket
的客户端和服务器端的支持。
对于开发人员来说,比较重要的是服务器端的开发,这也是本文的重点。在服务器端,WebFlux
支持两种不同的编程模型:第一种是 Spring MVC 中使用的基于 Java
注解的方式;第二种是基于 Java 8 的 Lambda
表达式的函数式编程模型。这两种编程模型只是在代码编写方式上存在不同。它们运行在同样的反应式底层架构之上,因此在运行时是相同的。WebFlux
需要底层提供运行时的支持,WebFlux 可以运行在支持 Servlet 3.1 非阻塞 IO
API 的 Servlet 容器上,或是其他异步运行时环境,如 Netty 和
Undertow。
本文从三个方面对 WebFlux 进行介绍。首先是使用经典的基于 Java
注解的编程模型来进行开发,其次是使用 WebFlux
新增的函数式编程模型来进行开发,最后介绍 WebFlux
应用的测试。通过这样循序渐进的方式让读者了解 WebFlux
应用开发的细节。
Java 注解编程模型
基于 Java 注解的编程模型,对于使用过 Spring MVC
的人来说是再熟悉不过的。在 WebFlux
应用中使用同样的模式,容易理解和上手。我们先从最经典的 Hello World
开始说明。
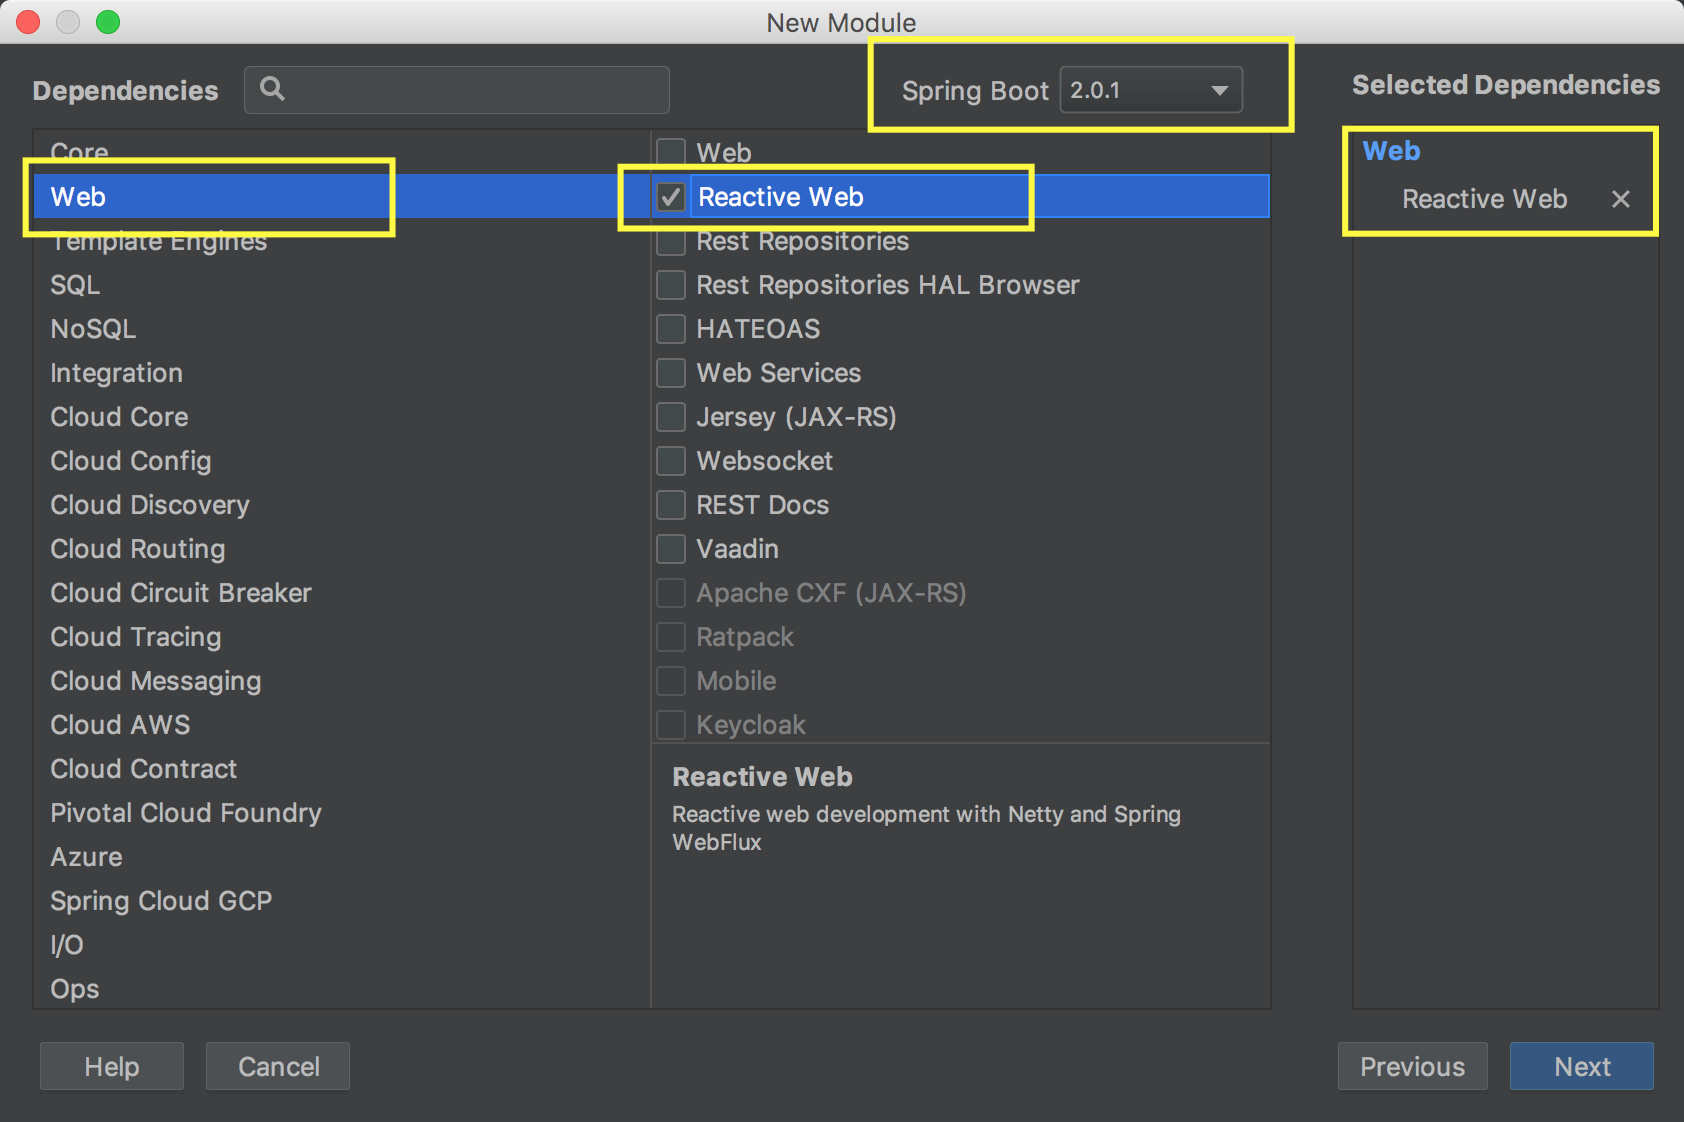
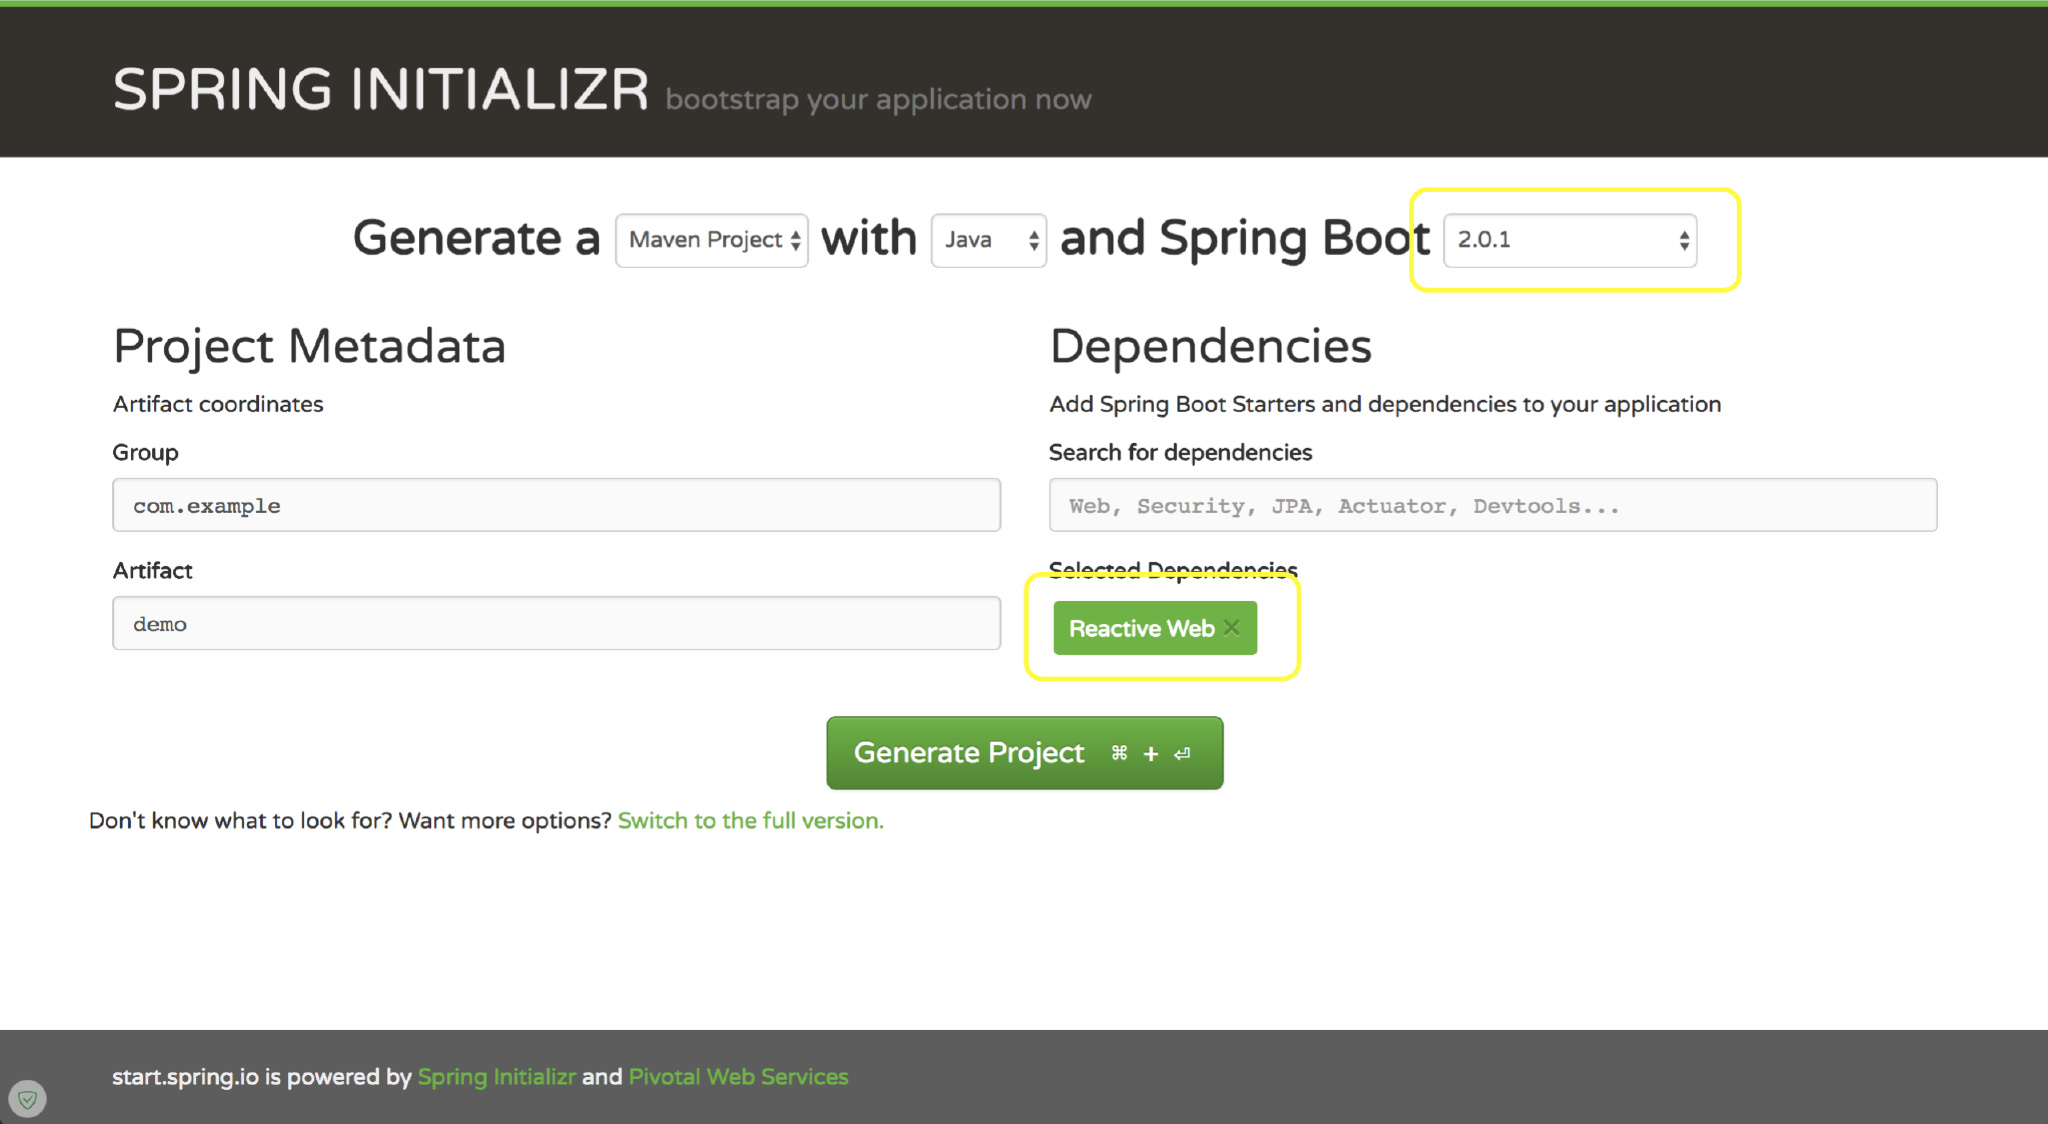
我们通过 Spring Initializ 创建一个 Spring Boot
工程,因为目前我们还不涉及 DAO 层,所以只选择 Reactive Web 就行了
也可以使用网页版的 https://start.spring.io 来创建项目:
创建后的项目 POM 中,包含下边的依赖,即表示基于 Spring WebFlux:
1 2 3 4 <dependency > <groupId > org.springframework.boot</groupId > <artifactId > spring-boot-starter-webflux</artifactId > </dependency >
创建 Controller 类HelloController,仅提供一个
Endpoint/hello:
1
2
3
4
5
6
7
8
9
@RestController public class HelloController {@GetMapping("/hello") public Mono<String> sayHello () {return Mono.just("Hello World!" );
我们启动应用,通过访问 http://localhost:8080/hello
可以得到返回值Hello World!。
通过这个简单的 Hello World 示例我们可以看到使用 WebFlux 与 Spring MVC
的不同在于,WebFlux 所使用的类型是与反应式编程相关的 Flux 和 Mono
等,而不是简单的对象。对于简单的 Hello World
示例来说,这两者之间并没有什么太大的差别。对于复杂的应用来说,反应式编程和负压的优势会体现出来,可以带来整体的性能的提升。
RESTful API
简单的 Hello World 示例并不足以说明 WebFlux
的用法。在下面的小节中,本文将介绍其他具体的实例。先从 RESTful API
开始说起。RESTful API 在 Web
服务器端应用中占据了很大的一部分。我们通过一个具体的实例来说明如何使用
WebFlux 来开发 RESTful API,该 RESTful API 用来对用户数据进行基本的 CRUD
操作。
作为领域对象的User类中包含了id、name和email三个基本的属性。
1
2
3
4
5
6
7
8
9
10
11
12
@Data @AllArgsConstructor @NoArgsConstructor public class User {private Integer id;private String name;private String email;
为了对User类进行操作,我们需要提供服务类UserService。UserService使用一个
Map
来保存所有用户的信息,并不是一个持久化的实现,这对于示例应用来说已经足够了。
1
2
3
4
5
6
7
8
9
10
11
12
13
14
15
16
17
18
19
20
21
22
23
24
25
26
27
28
29
30
31
32
33
34
35
36
37
38
39
@Service public class UserService {private final Map<Integer, User> data = new ConcurrentHashMap <>();@PostConstruct private void init () {1 , new User (1 , "张三" , "z3@qq.com" ));2 , new User (2 , "李四" , "l4@qq.com" ));3 , new User (3 , "王五" , "w5@qq.com" ));public Flux<User> list () {return Flux.fromIterable(this .data.values());public Flux<User> getByIds (Flux<Integer> ids) {return ids.flatMap(id -> Mono.justOrEmpty(this .data.get(id)));public Mono<User> getById (Integer id) {return Mono.justOrEmpty(this .data.get(id))new ResourceNotFoundException ()));public Flux<User> createOrUpdate (Flux<User> users) {return users.doOnNext(user -> this .data.put(user.getId(), user));public Mono<User> createOrUpdate (User user) {this .data.put(user.getId(), user);return Mono.just(user);public Mono<User> delete (Integer id) {return Mono.justOrEmpty(this .data.remove(id));
UserController是具体的 Spring MVC
控制器类,它使用UserService来完成具体的功能。UserController中使用了注解@ExceptionHandler来添加了ResourceNotFoundException异常的处理方法,并返回
404
错误。UserController中的方法都很简单,只是简单地代理给UserService中的对应方法。
1
2
3
4
5
6
7
8
9
10
11
12
13
14
15
16
17
18
19
20
21
22
23
24
25
26
27
28
29
30
31
32
33
34
35
36
37
38
39
@RestController @RequestMapping("/user") public class UserController {@Autowired private UserService userService;@ExceptionHandler(ResourceNotFoundException.class) @ResponseStatus(code = HttpStatus.NOT_FOUND, reason = "User not found") public void notFound () {}@GetMapping("") public Flux<User> list () {return userService.list();@GetMapping("/{id}") public Mono<User> getById (@PathVariable Integer id) {return userService.getById(id);@PostMapping("") public Flux<User> create (@RequestBody Flux<User> users) {return userService.createOrUpdate(users);@PutMapping("/{id}") public Mono<User> update (@PathVariable Integer id, @RequestBody User user) {return userService.createOrUpdate(user);@DeleteMapping("/{id}") public Mono<User> delete (@PathVariable Integer id) {return userService.delete(id);
我们可以通过访问 http://127.0.0.1:8080/user 获取到用户信息,其他的
CRUD 操作可以自行测试
1
2
3
4
5
6
7
8
9
10
11
12
13
14
15
16
17
[ { "id" : 1 , "name" : "张三" , "email" : "z3@qq.com" } , { "id" : 2 , "name" : "李四" , "email" : "l4@qq.com" } , { "id" : 3 , "name" : "王五" , "email" : "w5@qq.com" } ]
服务器推送事件(SSE)
服务器推送事件(Server-Sent
Events,SSE)允许服务器端不断地推送数据到客户端。相对于 WebSocket
而言,服务器推送事件只支持服务器端到客户端的单向数据传递。虽然功能较弱,但优势在于
SSE 在已有的 HTTP 协议上使用简单易懂的文本格式来表示传输的数据。作为 W3C
的推荐规范,SSE 在浏览器端的支持也比较广泛,除了 IE
之外的其他浏览器都提供了支持。在 IE 上也可以使用 polyfill
库来提供支持。在服务器端来说,SSE
是一个不断产生新数据的流,非常适合于用反应式流来表示。在 WebFlux 中创建
SSE 的服务器端是非常简单的。只需要返回的对象的类型是
Flux,就会被自动按照 SSE 规范要求的格式来发送响应。
下面的SseController是一个使用 SSE 的控制器的示例。
1
2
3
4
5
6
7
8
9
10
11
12
13
14
15
16
17
18
@RestController @RequestMapping("/sse") public class SseController {@GetMapping("/random") public Flux<ServerSentEvent<Integer>> random () {return Flux.interval(Duration.ofSeconds(1 )) return ServerSentEvent.<Integer>builder() "random" )
每 1 秒发出一个自增的 Long 值
使用ServerSentEvent.Builder来创建ServerSentEvent对象
在测试 SSE 时,我们只需要使用 curl 来访问即可。
1
2
3
4
5
6
7
8
9
10
11
12
$ curl http://localhost:8080/sse/random
WebSocket
WebSocket
支持客户端与服务器端的双向通讯。当客户端与服务器端之间的交互方式比较复杂时,可以使用
WebSocket。WebSocket 在主流的浏览器上都得到了支持。 WebFlux 也对创建
WebSocket
服务器端提供了支持。在服务器端,我们需要实现接口org.springframework.web.reactive.socket.WebSocketHandler来处理
WebSocket
通讯,其handle方法的参数是WebSocketSession对象,可以用来获取客户端信息、接送消息和发送消息。
下面的EchoHandler对于每个接收到的消息,都会在其前边添加一个前缀Echo ->再发送出去。WebSocketSession的receive()方法的返回值是一个Flux<WebSocketMessage>对象,表示的是接收到的消息流,而send()方法的参数是一个Publisher<WebSocketMessage>对象,表示要发送的消息流。
1
2
3
4
5
6
7
8
9
10
@Component public class EchoHandler implements WebSocketHandler {@Override public Mono<Void> handle (WebSocketSession session) {return session.send("Echo -> " + msg.getPayloadAsText())));
仅创建一个WebSocketHandler是不够的,我们还需要把它注册到
WebFlux 中。
我们再来需要创建一个WebSocketHandlerAdapter对象,该对象负责把
WebSocketHandler 关联到 WebFlux
中。其中我们使用HandlerMapping把EchoHandler映射到/echo端点。
1
2
3
4
5
6
7
8
9
10
11
12
13
14
15
16
17
18
19
20
21
@Configuration public class WebSocketConfiguration {@Autowired @Bean public HandlerMapping webSocketMapping (EchoHandler echoHandler) {new HashMap <>(1 );"/echo" , echoHandler);SimpleUrlHandlerMapping mapping = new SimpleUrlHandlerMapping ();return mapping;@Bean public WebSocketHandlerAdapter webSocketHandlerAdapter () {return new WebSocketHandlerAdapter ();
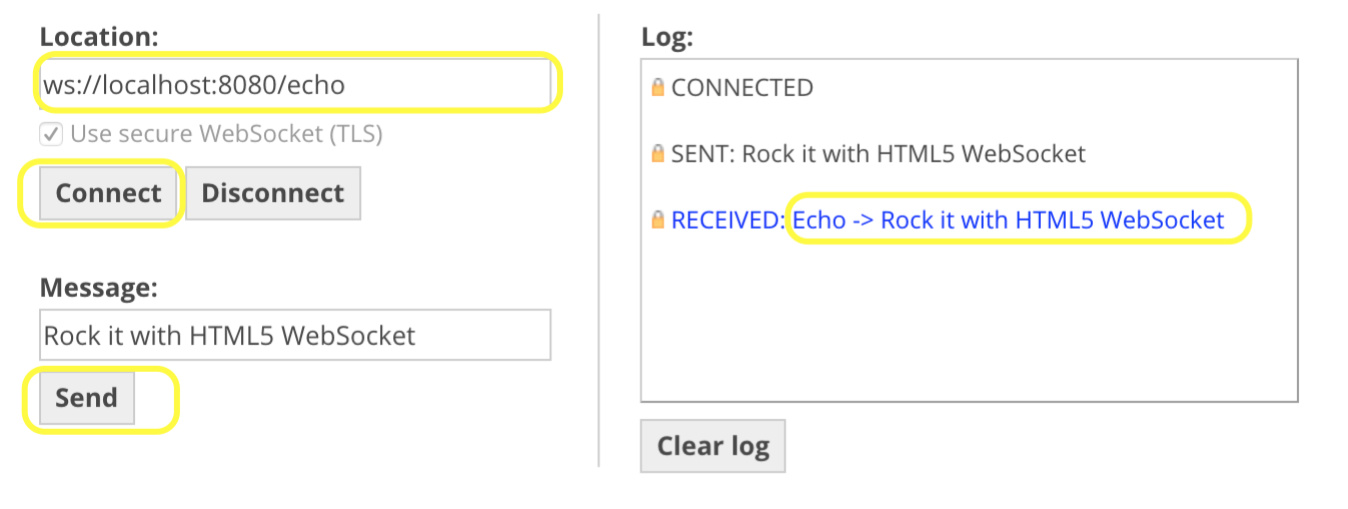
运行应用之后,可以使用工具 来测试该 WebSocket
服务。 打开工具页面 ,然后连接到ws://localhost:8080/echo可以发送消息并查看服务器端返回的结果。
函数式编程模型
前面介绍了基于 Java 注解的编程模型,WebFlux 还支持基于 Lambda
表达式的函数式编程模型。与基于 Java
注解的编程模型相比,函数式编程模型的抽象层次更低,代码编写更灵活,可以满足一些对动态性要求更高的场景。不过在编写时的代码复杂度也较高,学习曲线也较陡。
目前 Spring Boot
已支持在一个应用中同时使用两种不同的编程模式,我们可以根据实际的需要来选择合适的编程模型。
在函数式编程模型中,每个请求是由一个函数来处理的,
通过接口org.springframework.web.reactive.function.server.HandlerFunction来表示。HandlerFunction是一个函数式接口,其中只有一个方法,因此可以用
Labmda 表达式来实现该接口:
1 Mono<T extends ServerResponse > handle(ServerRequest request);
然后通过函数式接口org.springframework.web.reactive.function.server.RouterFunction来为这些HandlerFunction提供路由信息,输入为请求,输出为装在
Mono 里边的Handlerfunction
1 Mono<HandlerFunction<T>> route (ServerRequest request) ;
我们看到,在 WebFlux 中,请求和响应不再是 WebMVC
中的ServletRequest和ServletResponse,而是ServerRequest和ServerResponse。后者是在响应式编程中使用的接口,它们提供了对非阻塞和回压特性的支持,以及
HTTP 消息体与响应式类型 Mono 和 Flux 的转换方法。
下面我们用函数式的方式开发一个简单的计算器,有add、subtract、multiply和divide四个方法,都是接口HandlerFunction的实现,分别对应加、减、乘、除四种运算。
对于这个需求,HandlerFunction 很容易写:
1
2
3
4
5
6
7
8
9
10
HandlerFunction<ServerResponse> add = request -> ServerResponse.ok()"v1" ) + parseOperand(request, "v2" )), Integer.class);private int parseOperand (final ServerRequest request, final String param) {try {return Integer.parseInt(request.queryParam(param).orElse("0" ));catch (final NumberFormatException e) {return 0 ;
那么 RouterFunction 为:
1
2
3
4
@Bean public RouterFunction<ServerResponse> routerFunction () {return RouterFunctions.route(RequestPredicates.GET("/add" ), add);
启动服务,访问 http://localhost:8080/add?v1=2&v2=3 即计算 2+3
得到返回值5。
不过这么写在业务逻辑复杂的时候不太好组织,我们通常采用跟 MVC
类似的代码组织方式,将同类业务的 HandlerFunction 放在一个类中,然后在
Java Config 中将 RouterFunction 配置为 Spring 容器的
Bean。我们继续在这个计算器的代码上开发:
1
2
3
4
5
6
7
8
9
10
11
12
13
14
15
16
17
18
19
20
21
22
23
24
25
26
27
28
29
30
31
32
33
34
35
36
37
38
39
40
@Component public class CalculatorHandler {public Mono<ServerResponse> add (final ServerRequest request) {return calculate(request, (v1, v2) -> v1 + v2);public Mono<ServerResponse> subtract (final ServerRequest request) {return calculate(request, (v1, v2) -> v1 - v2);public Mono<ServerResponse> multiply (final ServerRequest request) {return calculate(request, (v1, v2) -> v1 * v2);public Mono<ServerResponse> divide (final ServerRequest request) {return calculate(request, (v1, v2) -> v1 / v2);private Mono<ServerResponse> calculate (final ServerRequest request, final BiFunction<Integer, Integer, Integer> calculateFunc) {final Tuple2<Integer, Integer> operands = extractOperands(request);return ServerResponseprivate Tuple2<Integer, Integer> extractOperands (final ServerRequest request) {return Tuples.of(parseOperand(request, "v1" ), parseOperand(request, "v2" ));private int parseOperand (final ServerRequest request, final String param) {try {return Integer.parseInt(request.queryParam(param).orElse("0" ));catch (final NumberFormatException e) {return 0 ;
我们采用 Spring 现在比较推荐的 Java Config 的配置 Bean
的方式,创建用于存放 Router 的配置类RouterConfig.java:
1
2
3
4
5
6
7
8
9
10
11
12
13
14
15
@Configuration public class RouterConfig {@Bean @Autowired public RouterFunction<ServerResponse> routerFunction (final CalculatorHandler calculatorHandler) {return RouterFunctions.route(RequestPredicates.path("/calculator" ), request ->"operator" ).map(operator ->
在上边的代码中,我们首先用RouterFunctions.route来根据Predicate是否匹配来确定HandlerFunction是否被应用。RequestPredicates中包含了很多静态方法来创建常用的基于不同匹配规则的Predicate,如RequestPredicates.path用来根据
HTTP
请求的路径来进行匹配,此处我们检查请求的路径是/calculator。然后使用ServerRequest的queryParam方法来获取到参数operator的值,然后通过反射
API
在CalculatorHandler中找到与参数operator的值名称相同的方法来确定要调用的HandlerFunction的实现,最后调用查找到的方法来处理该请求。如果找不到参数operator,服务器端返回
400 错误;如果反射 API 的方法调用中出现错误,服务器端返回 500 错误。
重启服务然后我们访问
http://127.0.0.1:8080/calculator?operator=add&v1=2&v2=3
得到返回值5。
客户端
除了服务器端实现之外,WebFlux 也提供了反应式客户端,可以访问
HTTP、SSE 和 WebSocket 服务器端。
HTTP
对于 HTTP 和 SSE,可以使用 WebFlux
模块中的类org.springframework.web.reactive.function.client.WebClient。下面的代码中我们将用RESTClient来访问前面小节中创建的
REST API。
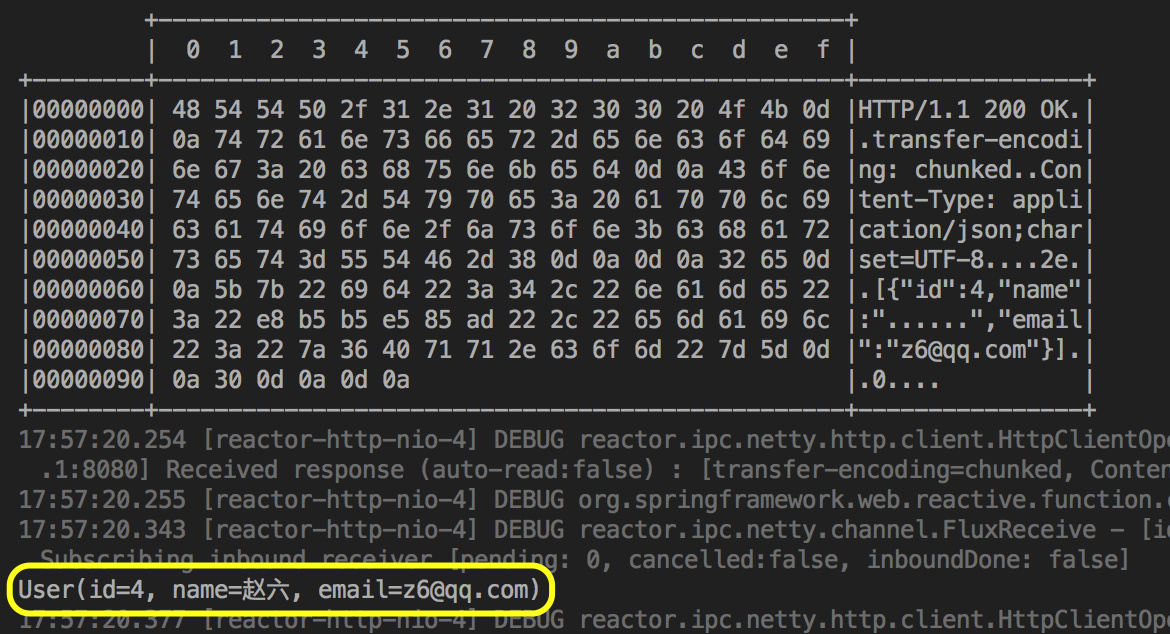
1
2
3
4
5
6
7
8
9
10
11
12
13
14
@Test public void testRESTClient () throws InterruptedException {User user = new User (4 , "赵六" , "z6@qq.com" );WebClient client = WebClient.create("http://localhost:8080/user" ); "" ) 1 );
使用WebClient.create方法来创建一个新的WebClient对象
使用post方法来创建一个 POST 请求
指定 baseUrl
配置请求 Header:Content-Type: application/json
使用body()方法来设置 POST 请求的内容
异步地获取 response
信息,返回值为WebClient.ResponseSpec,retrive()可以看做是exchange()方法的
“快捷版”(exchange()的返回值为ClientResponse)
WebClient.ResponseSpec的bodyToFlux方法把响应内容转换成User对象,最终得到的结果是Flux<User>打印出来
由于是异步的,我们将测试线程 sleep 1 秒确保拿到
response,也可以用CountDownLatch
SEE
WebClient 还可以用同样的方式来访问 SSE
服务。这里我们访问的是在之前的小节中创建的生成随机数的 SSE 服务。使用
WebClient 访问 SSE 在发送请求部分与访问 REST API
是相同的,所不同的地方在于对 HTTP 响应的处理。
1
2
3
4
5
6
7
8
9
10
11
12
13
14
15
16
17
18
19
20
@Test public void testSEEClient () {final WebClient client = WebClient.create();"http://localhost:8080/sse/random" )new ParameterizedTypeReference <ServerSentEvent<String>>() {}10 )
由于 SSE
服务的响应是一个消息流,我们需要使用flatMapMany把
Mono<ServerResponse>转换成一个Flux<ServerSentEvent>对象,这是通过方法BodyExtractors.toFlux来完成的,其中的参数new ParameterizedTypeReference<ServerSentEvent<String>>() {}表明了响应消息流中的内容是ServerSentEvent对象
由于 SSE
服务器会不断地发送消息,这里我们只是通过buffer方法来获取前
10 条消息并输出
只读地 peek 每个元素,然后打印出来,它并不是
subscribe,所以不会触发流
blockFirst方法,顾名思义,在收到第一个元素前会阻塞,响应式业务场景中慎用
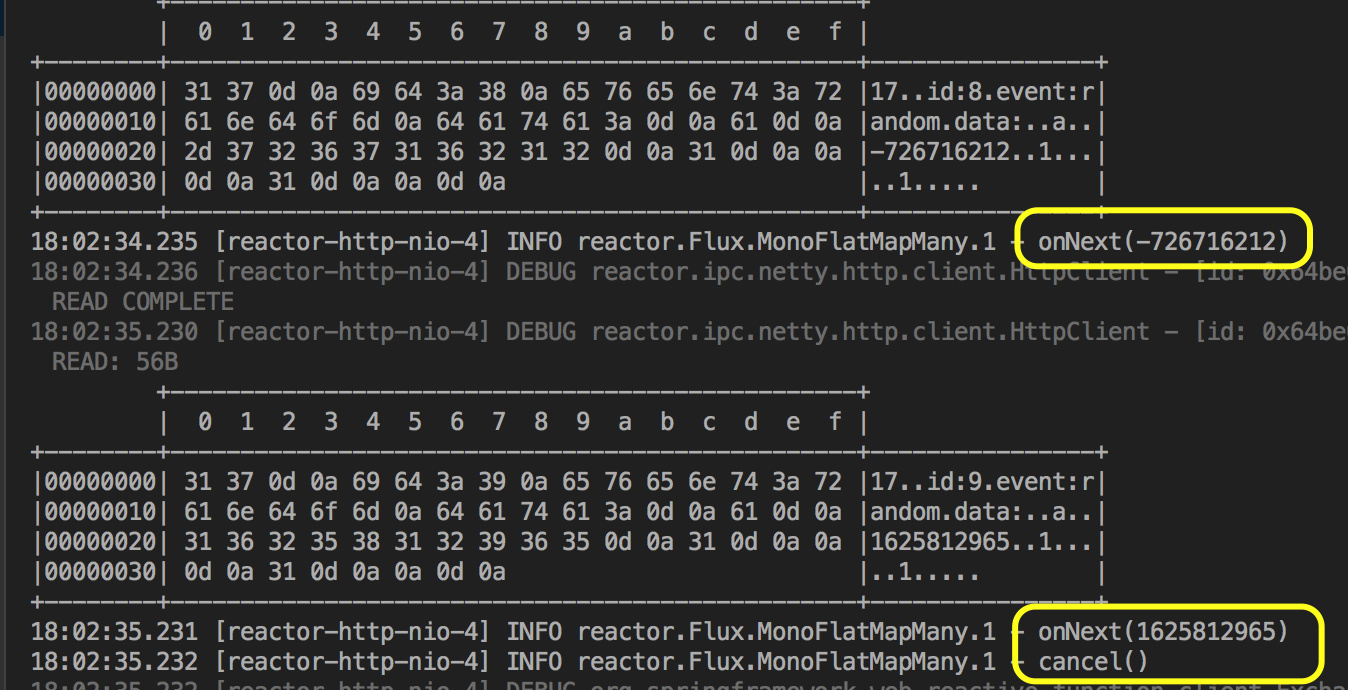
运行效果如下:
或者也可以像下边这样
1
2
3
4
5
6
7
8
9
10
11
12
@Test public void testSEEClient2 () {WebClient client = WebClient.create();"http://localhost:8080/sse/random" )10 )
运行效果如下:
WebSocket
访问 WebSocket 不能使用 WebClient,而应该使用专门的 WebSocketClient
客户端。Spring Boot 的 WebFlux 模板中默认使用的是 Reactor Netty
库。Reactor Netty 库提供了 WebSocketClient
的实现。我们这里访问前面创建的 WebSocket 服务。
1
2
3
4
5
6
7
8
9
10
@Test public void testWSClient () {WebSocketClient client = new ReactorNettyWebSocketClient (); "ws://localhost:8080/echo" ), session -> "Hello" ))) 1 ).map(WebSocketMessage::getPayloadAsText)) 5000 ));
创建一个 WebSocketClient 实例
使用 WebSocketClient 的execute方法与 WebSocket
服务器建立连接,并执行给定的 WebSocketHandler 对象
通过 WebSocketSession
的send方法来发送字符串”Hello”到服务器端
通过receive方法来等待服务器端的响应并输出,take(1)的作用是表明客户端只获取服务器端发送的第一条消息
运行效果如下:
测试
在 spring-test 模块中也添加了对 WebFlux 的支持。通过类
org.springframework.test.web.reactive.server.WebTestClient可以测试
WebFlux 服务器。进行测试时既可以通过 mock
的方式来进行,也可以对实际运行的服务器进行集成测试。
我们通过一个集成测试来测试UserController中的创建用户的功能。方法
WebTestClient.bindToServer绑定到一个运行的服务器并设置了基础
URL。发送 HTTP
请求的方式与之前的代码相同,不同的是exchange方法的返回值是ResponseSpec对象,其中包含了expectStatus和expectBody等方法来验证
HTTP 响应的状态码和内容。方法jsonPath可以根据 JSON
对象中的路径来进行验证。
1
2
3
4
5
6
7
8
9
10
11
12
13
14
15
16
17
public class UserControllerTest {private final WebTestClient client = WebTestClient.bindToServer().baseUrl("http://localhost:8080" ).build();@Test public void testCreateUser () throws Exception {User user = new User (5 , "钱七" , "q7@qq.com" );"/user" )"$[0].name" )"钱七" );
JsonPath 的语法可以看 https://github.com/json-path/JsonPath
总结
反应式编程范式为开发高性能 Web 应用带来了新的机会和挑战。Spring 5
中的 WebFlux 模块可以作为开发反应式 Web 应用的基础。由于 Spring
框架的流行,WebFlux 会成为开发 Web 应用的重要趋势之一。本文对 Spring 5
中的 WebFlux 模块进行了详细的介绍,包括如何用 WebFlux 开发 HTTP、SSE 和
WebSocket 服务器端应用,以及作为客户端来访问 HTTP、SSE 和 WebSocket
服务。对于 WebFlux 的基于 Java
注解和函数式编程等两种模型都进行了介绍。最后介绍了如何测试 WebFlux
应用。
示例代码:Github
参考
Web
on Reactive Stack 23. WebFlux
framework 使用
Spring 5 的 WebFlux 开发反应式 Web 应用 使用
Reactor 进行反应式编程 Reactor Netty Spring
WebFlux 快速上手
 Spring
Boot 2 是基于 Spring 5 的,其中一个比较大的更新就在于支持包括
spring-webflux 和响应式的 spring-data
在内的响应式模块,下边的例子我们就用 Spring Boot 2 在进行搭建。
Spring
Boot 2 是基于 Spring 5 的,其中一个比较大的更新就在于支持包括
spring-webflux 和响应式的 spring-data
在内的响应式模块,下边的例子我们就用 Spring Boot 2 在进行搭建。