本篇文章主要介绍了什么是 Spring Cloud Gateway,并基于 Spring Cloud
Gateway 的 Finchley.RC1 版本编写一个 Spring Cloud Gateway
的入门案例,即基本代理的路由转发配置。
img
概述
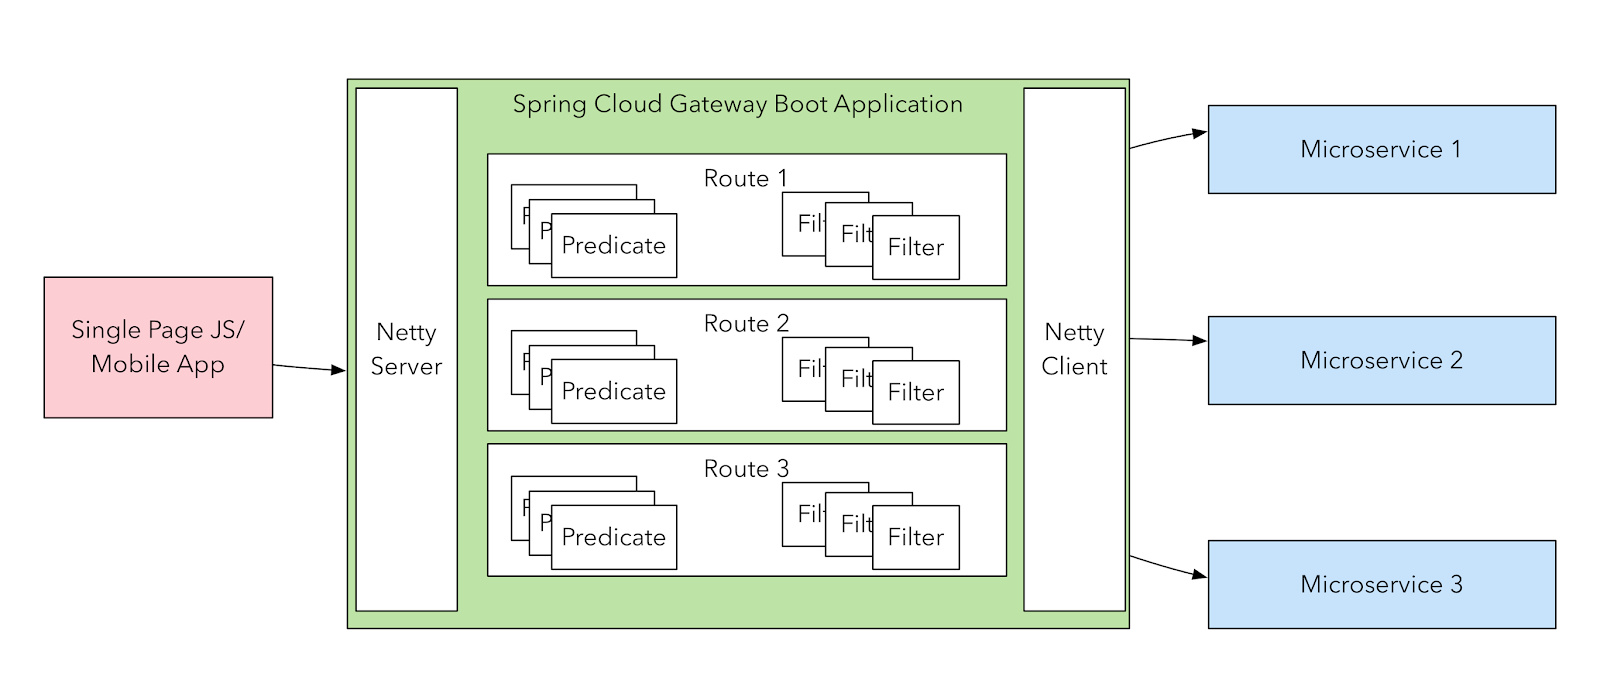
Spring Cloud Gateway 是 Spring Cloud 的一个全新项目,该项目是基于
Spring 5.0,Spring Boot 2.0 和 Project Reactor
等技术开发的网关,它旨在为微服务架构提供一种简单有效的统一的 API
路由管理方式。
Spring Cloud Gateway 作为 Spring Cloud 生态系统中的网关,目标是替代
Netflix Zuul,其不仅提供统一的路由方式,并且基于 Filter
链的方式提供了网关基本的功能,例如:安全、监控、埋点和限流等。
Spring Cloud Gateway 的特征:
基于 Spring Framework 5,Project Reactor 和 Spring Boot 2.0
动态路由
Predicates 和 Filters 作用于特定路由
集成 Hystrix 断路器
集成 Spring Cloud DiscoveryClient
易于编写的 Predicates 和 Filters
限流
路径重写
vs Netflix Zuul
Zuul 基于 Servlet 2.5(使用 3.x),使用阻塞
API,它不支持任何长连接,如 WebSockets。而 Spring Cloud Gateway 建立在
Spring Framework 5,Project Reactor 和 Spring Boot 2 之上,使用非阻塞
API,支持 WebSockets,并且由于它与 Spring
紧密集成,所以将会是一个更好的开发体验。
要说缺点,其实 Spring Cloud Gateway
还是有的。目前它的文档还不是很完善,官方文档有许多还处于 TODO
状态,网络上关于它的文章也还比较少。如果你决定要使用它,那么你必须得有耐心通过自己阅读源码来解决可能遇到的问题。(2018.5.7)
坑总是会有的,就看我们怎么来填平。
术语
Route(路由) :这是网关的基本构建块。它由一个
ID,一个目标
URI,一组断言和一组过滤器定义。如果断言为真,则路由匹配。Predicate(断言) :这是一个 Java
8 的 Predicate 。输入类型是一个ServerWebExchangeFilter(过滤器) :这是org.springframework.cloud.gateway.filter.GatewayFilter的实例,我们可以使用它修改请求和响应。
流程
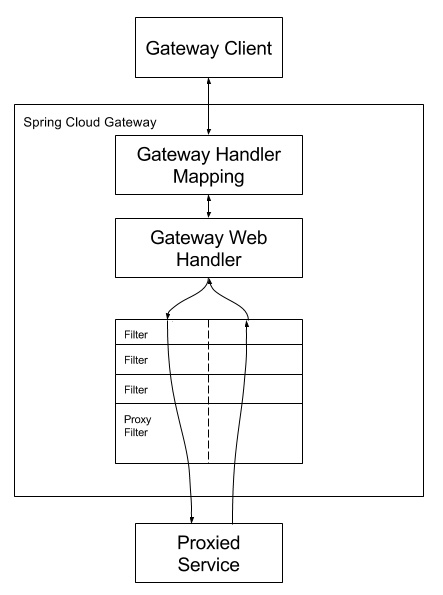
客户端向 Spring Cloud Gateway 发出请求。然后在 Gateway Handler
Mapping 中找到与请求相匹配的路由,将其发送到 Gateway Web
Handler。Handler
再通过指定的过滤器链来将请求发送到我们实际的服务执行业务逻辑,然后返回。
过滤器之间用虚线分开是因为过滤器可能会在发送代理请求之前(“pre”)或之后(“post”)执行业务逻辑。
实战
我们之前使用 Zuul
实现了一个网关 ,这里我们就用 Spring Cloud Gateway
来替代它实现相同的功能。在这里我们继续沿用之前已经写好的服务并依次启动:
新建一个标准的 Spring Boot 工程,命名为 gateway,然后在 pom.xml
中引入以下依赖坐标
1 2 3 4 5 6 7 8 <dependency > <groupId > org.springframework.cloud</groupId > <artifactId > spring-cloud-starter-gateway</artifactId > </dependency > <dependency > <groupId > org.springframework.cloud</groupId > <artifactId > spring-cloud-starter-netflix-eureka-client</artifactId > </dependency >
application.yml 配置文件内容如下
1
2
3
4
5
6
7
8
9
10
11
12
13
14
15
16
17
18
19
20
21
22
23
24
25
spring: application: name: cloud-gateway cloud: gateway: discovery: locator: enabled: true server: port: 10000 eureka: client: service-url: defaultZone: http://localhost:7000/eureka/ logging: level: org.springframework.cloud.gateway: debug
配置说明:
spring.cloud.gateway.discovery.locator.enabled:是否与服务注册于发现组件进行结合,通过
serviceId
转发到具体的服务实例。默认为false,设为true便开启通过服务中心的自动根据
serviceId 创建路由的功能。spring.cloud.gateway.routes用于配合具体的路由规则,是一个数组。这里我创建了一个
id
为default_path_to_http的路由,其中的配置是将未匹配的请求转发到https://haoyizebo.com。实际上开启了服务发现后,如果只使用默认创建的路由规则,这个
routes 不配置也是可以的,所以我就先注释掉了不用它了。网关服务监听 10000 端口
指定注册中心的地址,以便使用服务发现功能
调整相关包的 log 级别,以便排查问题
Spring Boot
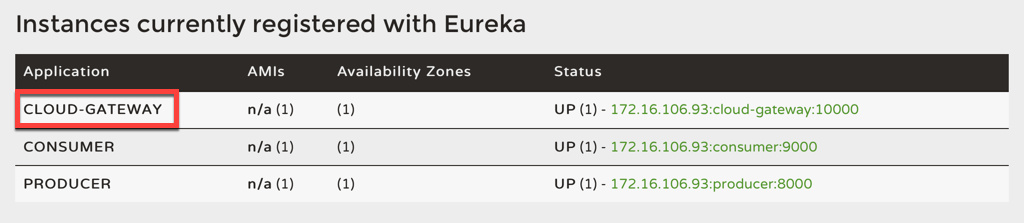
的启动类不用修改,直接启动即可(少了要加@Enable***注解这步我还有点不适应),启动后我们便可在
Eureka 中看到我们的网关服务
gateway in eureka
然后我们像之前使用 Zuul 那样访问
http://localhost:10000/consumer/hello/yibo
我们期待像直接访问 consumer 那样能返回 “Hello
yibo!”,但是实际上却出错了,返回了 404 错误。我们来看一下 log
1
2
3
4
5
6
7
8
9
10
2018-05-07 16:20:34.643 DEBUG 69502 --- [ctor-http-nio-2] o.s.c.g.r.RouteDefinitionRouteLocator : RouteDefinition CompositeDiscoveryClient_PRODUCER applying {pattern=/PRODUCER/**} to Path
可以看到 Spring Cloud Gateway 确实为我们的 producer 和 consumer
自动创建了对应的路由,但是这里的 pattern/regexp
里都是大写的。那我们就换成大写的来试一下。
访问 http://localhost:10000/CONSUMER/hello/yibo 确实返回了 “Hello,
yibo!”,这时再看 log
1
2
3
2018-05-07 16:32:06.473 DEBUG 69502 --- [ctor-http-nio-2] o.s.c.g.h.RoutePredicateHandlerMapping : Route matched: CompositeDiscoveryClient_CONSUMER
可以看出,Spring Cloud Gateway 自动的为我们的 consumer
创建了一个路由,类似于下边这样
1
2
3
4
5
6
7
8
routes: - id: CompositeDiscoveryClient_CONSUMER uri: lb://CONSUMER order: 0 predicates: - Path=/CONSUMER/** filters: - RewritePath=/CONSUMER/(?<segment>.*), /$\{segment}
但是这种必须将 serviceId 大写的方式还是比较蛋疼的,虽然 Eureka
注册中心默认显示的都是大写的,但是这大写的路径放在 URL
真的好吗?我唯一能想到的好处就是能清晰分辨出 serviceId 和 path。
如果大写的 URL
在浏览器里自动变成了小写的,可以试试:清空缓存、使用无痕模式(command+shift+n)、在终端直接用curl。
上边是基于服务发现的默认路由规则,如果我们要自定义路由规则怎么办呢?
比如我们的这个服务是跟客户服务相关的(嗯,目前它功能比较单一,只会跟客户
say hi,但是这没有影响),我们希望这个服务的 path 以
/customer/ 开头,具体到这个例子,就是
/costomer/hello/{name}。并且,我们还要为每个响应添加一个响应头X-Response-Default-Foo: Default-Bar。
让我们来修改一下配置,主要是增加一个 route,其他配置不变
1
2
3
4
5
6
7
8
9
routes: - id: service_customer uri: lb://CONSUMER order: 0 predicates: - Path=/customer/** filters: - StripPrefix=1 - AddResponseHeader=X-Response-Default-Foo, Default-Bar
新增的StripPrefix可以接受一个非负整数,对应的具体实现是StripPrefixGatewayFilterFactory,从名字就可以看出它的作用是去掉前缀的,那个整数即对应层数。具体到本例中,我们通过
Spring Cloud Gateway 访问
/customer/hello/yibo,那么当网关服务向后转发请求时,会去掉/customer,微服务收到的就是/hello/yibo。
现在这个 filters 下面的配置不用深究,按这么配置就好,下一篇会详细讲
Filter。
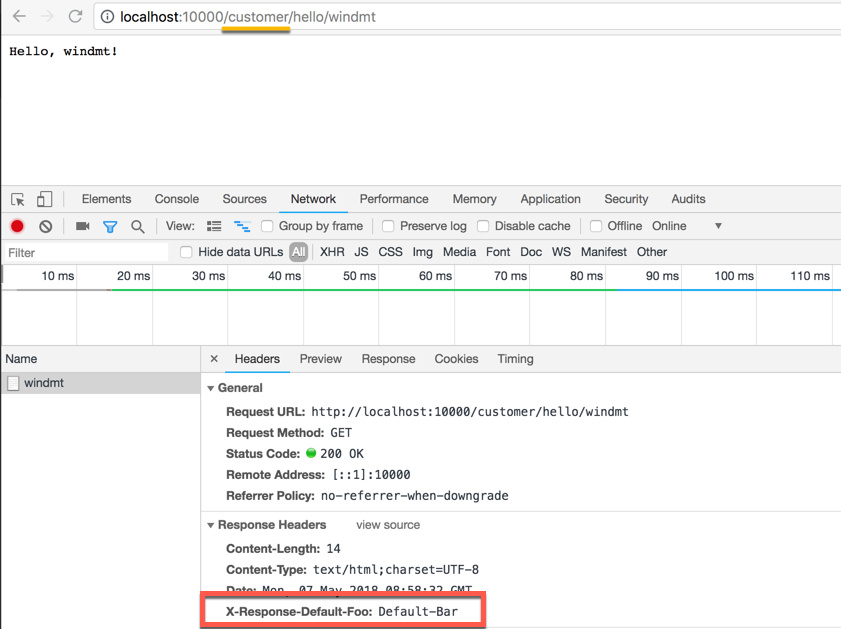
我们现在访问 http://localhost:10000/customer/hello/yibo
可以看到能正常返回数据并且响应头也加上了。这时候
http://localhost:10000/CONSUMER/hello/yibo
虽然依旧能正常返回数据,但是并没有我们自定义的响应头。
image-20180507170005882
Spring Cloud Gateway 也支持通过 Java 的流式 API
进行路由的定义,如下就是一个和上边通过配置文件配置的等效的路由,并且可以和配置文件搭配使用。
1
2
3
4
5
6
7
8
9
10
11
12
13
14
@Bean public RouteLocator customerRouteLocator (RouteLocatorBuilder builder) {return builder.routes()"/fluent/customer/**" )2 )"X-Response-Default-Foo" , "Default-Bar" ))"lb://CONSUMER" )0 )"fluent_customer_service" )
总结
本文我们简单了解了 Spring Cloud
Gateway,并用它实现了一个简单的网关服务。既介绍了通过结合注册中心 Eureka
来为微服务提供默认的路由,也介绍了如何通过配置文件和 API
去自定义路由,相信大家对 Spring Cloud Gateway
已经有了个初步的认识。后面的文章我们也会继续去发现 Spring Cloud Gateway
更多强大的功能。
示例代码可以从 Github
获取:https://github.com/zhaoyibo/spring-cloud-study
参考
Spring
Cloud Gateway spring-cloud-gateway-sample