前言
先决条件 ✔️ 正确安装 RabbitMQ 并将其运行在
localhost:5672 上 ✔️ 已经了解了 RabbitMQ 中的一些基础概念
在前一篇 中,我们实现一个简单的发送、接收消息的程序。在本文中,我们将创建一个工作队列,用于在多个消费者之间分发耗时的任务。
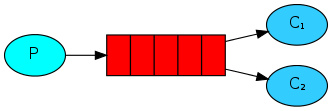
工作队列(也称为:任务队列,Task
Queues)主要是为了避免等待一些占用大量资源、时间的操作。当我们把任务(Task)当作消息发送到队列中,一个运行在后台的工作者(worker)进程就会取出任务然后处理。当你运行多个工作者(workers),任务就会在它们之间共享。
这个概念在网络应用中是非常有用的,它可以在短暂的 HTTP
请求中处理一些复杂的任务。
准备
在前一篇教程 中,我们发送了一条包含”Hello
World!“的消息。现在,我们将发送一些字符串,把这些字符串当作复杂的任务。我们并没有一个真实的复杂任务,类似于图片大小被调整或
pdf 文件被渲染,所以我们通过
sleep()方法来模拟这种情况。我们在字符串中加上点号(.)来表示任务的复杂程度,一个点(.)将会耗时
1 秒钟。比如”Hello…” 就会耗时 3 秒钟。
如果您尚未设置项目,请参阅第一个教程 中的设置。我们将遵循与第一个教程相同的模式:创建一个包(tut2)并创建
Tut2Config、Tut2Receiver 和 Tut2Sender。
代码整合
首先创建一个新的包(tut2),我们将在这里放置我们的三个类。在配置类
Tut2Config 中,我们设置了两个配置文件——tut2 和 work-queues。我们利用
Spring 来将队列 Queue 暴露为一个 bean。我们配置消费者,并定义两个 bean
以对应于上图中的工作进程 receiver1 和 receiver2。
配置类
1
2
3
4
5
6
7
8
9
10
11
12
13
14
15
16
17
18
19
20
21
22
23
24
25
26
27
28
29
30
31
32
@Profile({"tut2", "work-queues"}) @Configuration public class Tut2Config {@Bean public Queue queue () {return new Queue ("work-queues" );@Profile("receiver") private static class ReceiverConfig {@Bean public Tut2Receiver receiver1 () {return new Tut2Receiver (1 );@Bean public Tut2Receiver receiver2 () {return new Tut2Receiver (2 );@Profile("sender") @Bean public Tut2Sender sender () {return new Tut2Sender ();
生产者
我们简单修改一下生产者的代码,以添加点号(.)的方式来人为的增加该任务的时长,字符串中的每个点号(.)都会增加
1s 的耗时。
1
2
3
4
5
6
7
8
9
10
11
12
13
14
15
16
17
18
19
20
21
22
23
24
25
26
27
public class Tut2Sender {@Autowired private AmqpTemplate template;@Autowired private Queue queue;int dots = 0 ;int count = 0 ;@Scheduled(fixedDelay = 1000, initialDelay = 500) public void send () {StringBuilder builder = new StringBuilder ("Hello" );if (dots++ == 3 ) {1 ;for (int i = 0 ; i < dots; i++) {'.' );String message = builder.toString();" [x] Sent '" + message + "'" );
消费者
我们的消费者 Tut2Receiver 通过 doWork()
方法模拟了一个耗时的虚假任务,它需要为消息体中每一个点号(.)模拟 1
秒钟的操作。并且我们为消费者增加了一个实例编号,以知道是哪个实例消费了消息和处理的时长。
1
2
3
4
5
6
7
8
9
10
11
12
13
14
15
16
17
18
19
20
21
22
23
24
25
26
27
28
29
@RabbitListener(queues = "work-queues") public class Tut2Receiver {private int instance;public Tut2Receiver (int instance) {this .instance = instance;@RabbitHandler public void receive (String in) throws InterruptedException {StopWatch watch = new StopWatch ();"instance " + this .instance +" [x] Received '" + in + "'" );"instance " + this .instance +" [x] Done in " + watch.getTotalTimeSeconds() + "s" );private void doWork (String in) throws InterruptedException {for (char ch : in.toCharArray()) {if (ch == '.' ) {1000 );
运行
maven 编译
1 mvn clean package -Dmaven.test.skip=true
运行
1
2
java -jar target/rabbitmq-tutorial-0.0.1-SNAPSHOT.jar --spring.profiles.active=tut2,sender --tutorial.client.duration=60000
输出
1
2
3
4
5
6
7
8
9
10
11
12
13
14
15
16
17
18
19
20
21
22
23
24
25
26
27
28
29
30
// Sender
prefetch
从消费者这端的输出可以看出来,instance 1
得到的任务编号始终是奇数(Hello.1,Hello…3,Hello..5,Hello.7),而
instance 2 得到的任务编号始终是偶数。
如果感觉这次的输出只是巧合,可以多试几次或通过--tutorial.client.duration=调整时长得到更多的输出,而结果肯定都是一样的。
这里设计的问题就是之前在基础概念 里讲到的调度策略的问题了。要实现公平调度(Fair
dispatch)就是设置 prefetch 的值,实现方式有两种。
全局设置
在application.yml中设置spring.rabbitmq.listener.simple.prefetch=1即可,这会影响到本
Spring Boot
应用中所有使用默认SimpleRabbitListenerContainerFactory的消费者。
网上很多人说改配置pring.rabbitmq.listener.prefetc,实测已经无效,应该是版本的问题。我所使用的版本(RabbitMQ:3.7.4,Spring
Boot:
2.0.1.RELEASE),除了spring.rabbitmq.listener.simple.prefetch,还有一个spring.rabbitmq.listener.direct.prefetch可以配置。
改了配置后再运行,可以看到 instance 1
可以获取到”Hello…6”、“Hello…12”了。
1
2
3
4
5
6
7
8
9
10
11
12
13
14
15
16
17
18
19
20
21
22
23
Ready ... running for 60000ms
特定消费者
上边是改了全局的消费者,如果只针对特定的消费者的话,又怎么处理呢?
我们可以通过自定义RabbitListenerContainerFactory来实现。
1
2
3
4
5
6
7
@Bean public RabbitListenerContainerFactory<SimpleMessageListenerContainer> prefetchOneRabbitListenerContainerFactory (ConnectionFactory rabbitConnectionFactory) {SimpleRabbitListenerContainerFactory factory = new SimpleRabbitListenerContainerFactory ();1 );return factory;
然后在特定的消费者上指定containerFactory
1
2
3
4
@RabbitListener(queues = "hello", containerFactory = "prefetchTenRabbitListenerContainerFactory") public void receive (String in) {" [x] Received '" + in + "'" )
代码地址:https://github.com/zhaoyibo/rabbitmq-tutorial
相关文章:
RabbitMQ(零):基础概念 RabbitMQ(一):Hello World RabbitMQ(二):工作队列(Work
queues) RabbitMQ(三):发布订阅(Publish/Subscribe) RabbitMQ(四):路由(Routing) RabbitMQ(五):主题(Topics) RabbitMQ(六):远程过程调用(RPC)
参考
RabbitMQ
Tutorial Two